MJF Texturing: Improving 3D Printing with Aesthetics and Function
3D printing provides the opportunity to create highly aesthetic and functional parts without high up-front costs. Designers can use software tools to combine aesthetic textures with basic design principles and advanced DfAM techniques that improve the business case. A textured 3D printed part costs no more to print than an untextured part, but delivers more overall value to the end user. Today, one of the most common textures is to mimic the noise surface of injection molded parts. In traditional manufacturing, this would require expensive etching techniques, but for 3D printing, the noise texture helps disguise the fact that it is 3D printed and makes the whole part feel more valuable.

Textures for automotive 3D printed parts. Source: HP
This article will review how (1) software tools are making textures more accessible, how to best use (2) aesthetic and (3) functional textures during the design phase, and (4) how post-processing textures further enhances 3D printed parts.
Software Tools for Adding Textures to 3D Printed Parts

HP’s texturing tool. Source: HP
These tools are becoming increasingly sophisticated, allowing near-seamless surfaces. In the past, small inconsistencies in the surface caused by mismatched faces would leave scars in the texture. Now they are automatically corrected by these tools. Improvements in computer graphics have also improved so that you can adjust texture parameters and instantly see the results on screen. The last historical problem was the large file size of textured surfaces (or mesh structures) that were exported in the .stl file format. Now, 3D printers are increasingly working with native file formats, which saves significant processing time. Newer file formats, such as .3mf, are also contributing to more efficient workflows. For engineers who aren’t familiar with texturing or don’t want to invest the time to learn, working with an experienced production partner is an excellent alternative.

Sample textures within HP’s texture library. Source: HP
Best Practices for Texturing 3D Data

MJF 3D printed bicycle grip with texture. Source: HP
Data Preparation
- Prepare Clean Surfaces: Make sure there are no stray edges, such as from merging with other geometries, that create irregularities on the surfaces of the design.
- Join Textured Surfaces: When possible, areas that will have the same texture in the final design should be grouped so that a single selection will include all areas. This is more difficult to do in the texturing tool than in the original design software.
- Use Balanced Mesh Density: The correct resolution for surfaces, which is determined by the density of the mesh, plays a role in creating well-balanced textures without overburdening the system with large files.
Coordinating with Production
- Consider Print Orientation: The best print resolution is on the X-Y plane, so the most visually or functionally important surfaces should be oriented in that direction.
- Account for Material Effects: PA12 and PA11 will show the best and most consistent texturing. PP and TPU are softer and will lose texture detail. If you are using the same texture on multiple materials, you will need to adjust the parameters.
- Plan for Post-Processing: As described later, chemical smoothing or painting and surface coating will override the texture, so it may require more pronounced depth in the initial design and production.
- Pay Attention to Texturing Around Edges: Due to differences in production based on print orientation, textures that wrap edges may look inconsistent between the X-Y and Z planes, so it may be necessary to tilt the part or work with two different texture patterns.

MJF 3D printing textures. Source: HP
Enhancing Aesthetics with 3D Printed Textures
The most common use of texturing is to add a noise texture to the surface of a 3D printed part. Since these noise textures are generally associated with the more expensive etching of injection molds, there is an automatic association by users that these parts are of higher quality. It is an association that has been made over decades and represents a “quick win” for MJF parts. The noise texture has a secondary purpose of helping to hide the tell-tale signs of 3D printing ( layers of new powder being applied during printing). When 3D printed parts are first introduced into a corporate environment or product line, there is still a perception that the performance will not match that of conventionally manufactured parts. By adding a texture to mask the source of the part, users will judge the part based on whether it meets a specific need – not based on the manufacturing process.

A variety of different HP 3D printing textures. Source: HP

From a commercial standpoint, textures can also be added to a white label part design, to be sold as a value-add by varying the look of the texture for each customer. Even within a single print job, the split between different logos and textures can be adjusted to match sales in a 1:1 ratio – truly lean manufacturing.
3D printing can be used to quickly iterate textured surfaces for new products, even if they will eventually be injection molded. The ability to test different grains, shapes or visual designs in quick succession at low cost can be a key part of new product development. Depending on the complexity of the part and the extent of texturing, these costs can be reduced by a factor of 5-50. The ability to have usable parts with different designs for user testing is a very valuable method to validate new products.
How 3D Printed Textures Enhance Performance
Other benefits of using textures to improve grip include adding “grit” to gears or rollers that have belts running around them. A light texture will improve the grip of the belt, even as it wears and smooths over time. Another key area where textures can play a key role in performance is for automation grippers. Using different textures and topical shapes can improve the accuracy and repeatability of the process. Since automation is all about repeating a single motion over and over again, reducing errors and improving efficiency have a direct impact on improving the overall business case.
The exact amount of texture performance improvement is difficult to predict in advance, so it is best to test several different options to get the right performance in the end. 3D printing, with its ability to produce and thus test multiple designs without increasing costs, is a perfect medium for iteratively optimizing performance. The approach directly mimics the process we described for assembly consolidation, which also streamlines processes in ways that are difficult to simulate in advance.

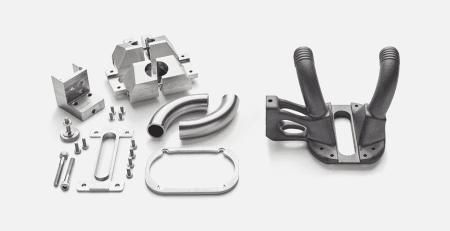
Complex duct 3D printed with MJF 3D printing and PA 12. Source: HP
Surface textures can also be important for air and material flow systems. Depending on the desired application, ridges or embossed shapes that add chaos to a system can help reduce the speed of air coming in from an external source, or stir two liquids together in a chamber by introducing irregularities into the flow. At the other extreme, it may be important to have very smooth surfaces in other areas of the design to increase speed using chemical smoothing (described below). Although it falls between design and texture, having perforated areas within a design is another important use case to allow air or sound to pass through certain regions of a part. All of this can be done with little investment of time and money using advanced design tools and 3D printing.
Post Processing for Stunning Textures
By producing textures that are smoothed with chemical polishing, the consumer perceives it as a high-quality part. This helps justify the final business case. Since 3D printing tends to be more expensive per part, aiming to replace or compete with high-value components is a recipe for success.
The chemical smoothing process for additive manufacturing is a much younger technology than the more than 30 years of 3D printing. It involves hanging the part in a closed chamber and pumping an aggressive gas around it. This causes the surface to melt slightly and it can then solidify. Similar to applying a decal to a car or wall with a hair dryer, the hills and valleys on the part’s surface are evened out. The resulting part is not only smoother, but also more air and watertight.

Varying levels of texturing and post processing on glasses
In the Multi Jet Fusion process, standard PA12 and PA11 materials are an anthracite gray after production. Chemical smoothing results in a rich black color, as expected from standard plastic parts. Especially when working with textures, chemical smoothing transforms the surface from matte to glossy, bringing out the texture more clearly to the eye. The same is true for white parts made with the latest HP PA12 material, which can remain white or be dyed to any color required for the application. When chemically smoothed, standard parts are much more visually appealing and meet the “consumer expectation” for high-end components.

PA 12 White Medical Helmet. Source: Invent Medical
Painting or coating parts instead of chemically smoothing them tends to make them more resistant to chemicals and especially UV for outdoor applications. This is one of the most common reasons for painting, as long-term outdoor use can wear parts down quickly. After finishing and painting, 3D-printed parts can be used in machines and vehicles all year long in standard weather conditions.
Flexible 3D printed parts can also be coated and colored with BASF Forward AM’s Ultracur3D® Coat F. This two-component topcoat provides additional protection to the part. At the same time, it enhances the visual texture, either with a smooth coating or by bringing out designer textures. For consumer products, this is an important way to achieve consistent color on durable parts with minimal effort.

Source: Forward AM
Textures Bring Wider Use of 3D Printed Parts
Functional textures are often an overlooked, but valuable, way to improve part performance. This can be as simple as adding “grit” to increase friction between parts or as complex as creating mixing behavior for powders or liquids with irregular surfaces. Applying textures to 3D printed parts is getting easier so now is the time to take advantage of the opportunity. A trusted manufacturing service or your in-house CAD design team can add the textures that make parts more visually appealing and functional. This improves the business case, accelerates public acceptance and ultimately ensures that your 3D-printed products find the wider audience and use you are looking for.